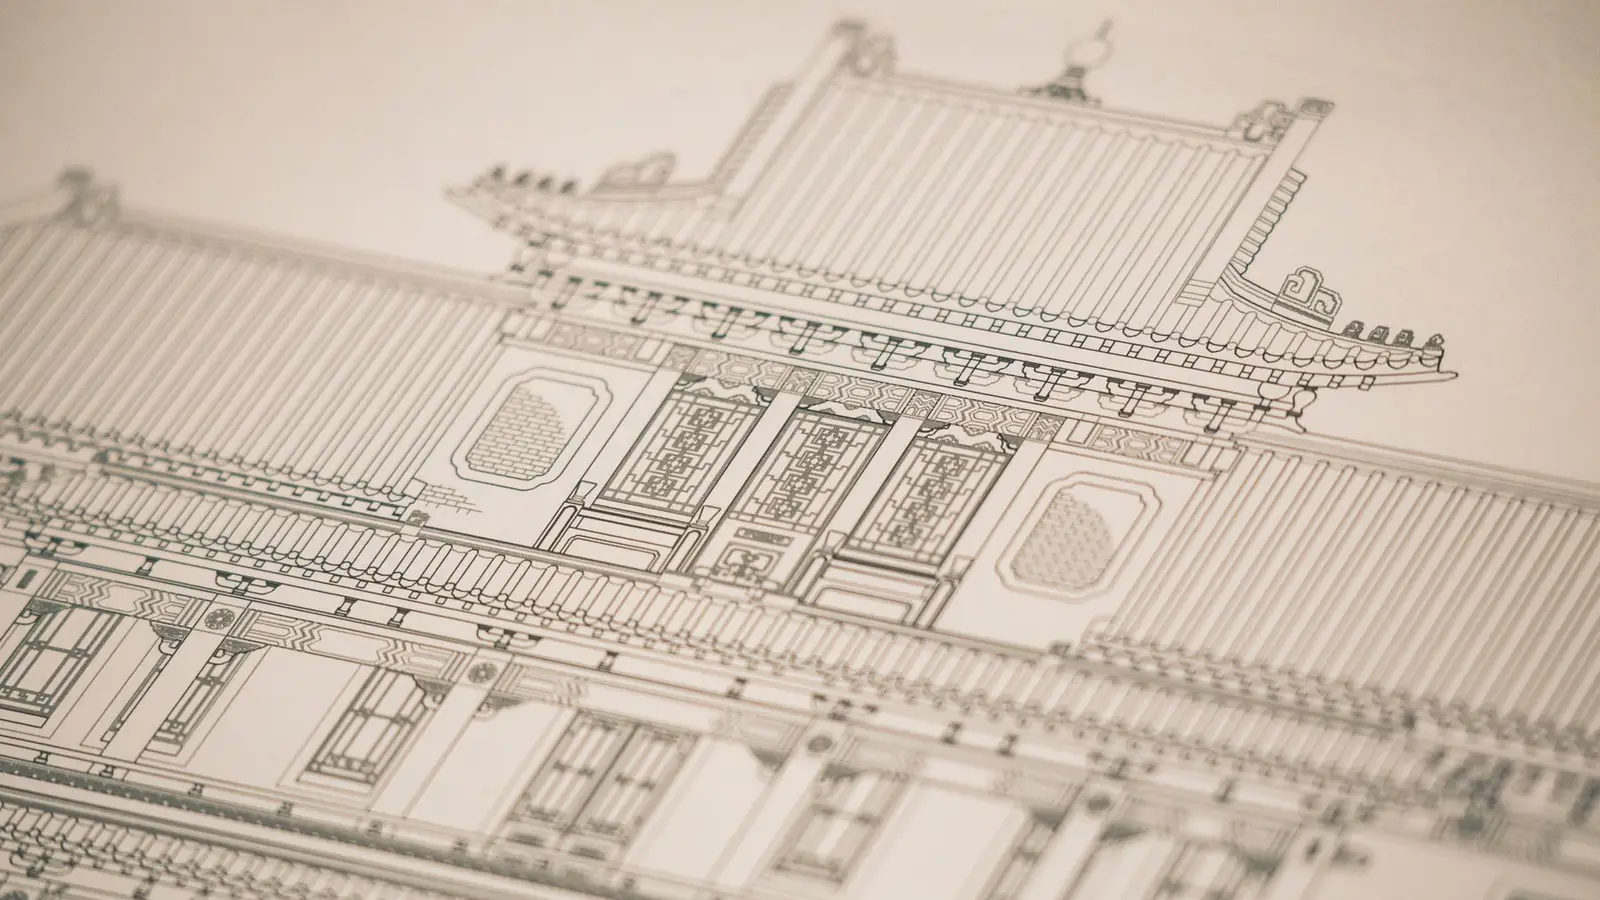

Elevation drawings are flat, straight-on views of each exterior side of a building, usually labelled north, south, east and west, or front, rear, left and right. They show the building’s height, roof shape and pitch, windows and doors, materials and the relationship to the ground. Permit reviewers use them to check height limits, window placement and exterior details, and HOAs and historic commissions use them to judge appearance.
Quick answer: Elevation drawings show each face of a building as if viewed straight on, with no perspective. For permits they should show finished grade, floor levels, plate and ridge heights, overall building height measured as the code defines it, roof pitch, windows and doors, exterior materials, and any decks, stairs or guards. They are required for additions, new homes, garages, ADUs and many exterior changes.
Key takeaways
- Elevations are orthographic: no perspective, so dimensions can be scaled.
- Height is the most important thing reviewers check on elevations.
- Elevations must match the floor plans exactly: same windows, same doors.
- HOAs and design review boards rely on elevations for appearance decisions.
- Elevations show the outside; sections show what is inside the walls.
When you need elevation drawings
| Project | Elevations usually needed? |
|---|---|
| New house | Yes, all sides |
| Addition | Yes, affected sides, often all |
| Second storey | Yes, all sides |
| Detached garage, ADU, workshop | Yes |
| Deck | Often a single elevation or section with guards and stairs |
| Window or door changes | Often, especially in historic districts or HOAs |
| Interior remodel | Rarely |
| Fence | A simple fence elevation |
Elevations sit alongside floor plans and sections in a permit drawing set.
What elevation drawings show
- Grade lines: existing and finished grade along the building.
- Floor levels: finished floor elevations of each level.
- Plate heights: where walls meet the roof.
- Ridge and roof heights: highest points of the roof.
- Overall height: dimensioned to the code’s definition.
- Roof pitch: rise over run, such as 6:12.
- Windows and doors: positions, sizes, types and tags.
- Exterior materials: siding, trim, roofing, stone, with notes.
- Features: chimneys, porches, decks, guards, stairs, vents.
- Existing vs new: on additions, the part being added must be clear.
Height: what reviewers check first
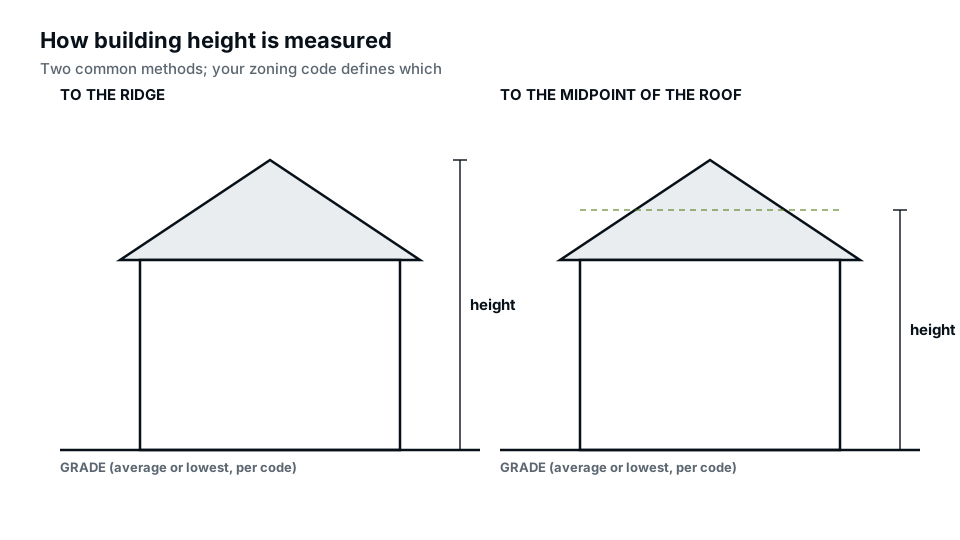
Zoning codes limit building height, and accessory buildings often have lower limits than houses. The way height is measured varies: to the highest point, to the midpoint of a pitched roof, from average existing grade, from finished grade, or from the lowest point. Elevations must show the reference points and dimension the height the way your code defines it. Our guide on how building height is measured explains the common methods.
Roof pitch
Elevations show the roof slope as a small triangle with rise over 12 inches of run. Pitch affects height, the roofing materials allowed, snow shedding and appearance. A steeper roof on a second-storey addition can push height over the limit. See roof pitch explained.
Windows, doors and coordination with floor plans
Every window and door on the floor plan must appear in the right place on the elevations, at the right size. Reviewers compare them. Mismatches, such as a window on the plan that isn’t on the elevation, are a frequent correction. Elevations also show head and sill heights, which matter for egress windows and for fire separation rules where walls are close to property lines.
Exterior materials
Material notes on elevations tell the reviewer, HOA or historic commission what the building will look like and how it is protected from weather and fire. Some codes restrict materials near property lines or in wildfire-prone areas. HOAs often require specific siding, roofing and colours. A short material legend or callouts on each elevation is enough for most projects.
Elevations for additions
On an addition, elevations show the existing house and the new part together, with the new work hatched or noted. They show how the new roof meets the existing one, how floor levels match, and whether the addition changes the overall height. Reviewers also look at new openings near property lines. See our home addition permit guide.
Elevations for garages, ADUs and accessory buildings
Accessory buildings often have strict height limits, sometimes as low as 15 feet or less to the ridge or midpoint. The elevation is where compliance is proven. Show grade around the building, the slab height above grade, wall height, roof pitch and the measured height. See our garage permit guide and ADU permit guide.
Elevations vs sections vs renderings
| Drawing | View | Used for |
|---|---|---|
| Elevation | Exterior face, flat | Height, openings, materials, appearance |
| Section | Vertical cut through the building | Structure, insulation, ceiling heights |
| Rendering | Perspective, realistic | Presentation, HOA and neighbour understanding |
See elevation vs section drawings and our architectural rendering guide.
Elevations for HOA and design review
Architectural review committees and historic commissions judge proposals mostly from elevations: proportions, rooflines, window patterns, materials and colours. Clear, well-labelled elevations with a colour or material legend speed approval. See HOA architectural review.
Grade and sloped sites
On sloped lots, the grade line along each elevation differs, which changes the measured height and the exposed foundation. Show existing and finished grade on each elevation, and note any retaining walls or stepped foundations. Height is often measured from average grade, so show the spot elevations used. On hillside lots, sections often accompany elevations to explain the relationship to the slope.
Scale and format
Residential elevations are usually drawn at ¼ inch = 1 foot for small buildings or ⅛ inch = 1 foot for larger ones. Each elevation should be titled (for example “North Elevation”) with its scale. Use consistent line weights: heavier for the building outline, lighter for details. Include reference levels as horizontal lines with labels.
Common elevation corrections
- Building height not dimensioned or measured incorrectly.
- Grade not shown, so height can’t be checked.
- Windows and doors don’t match the floor plans.
- Roof pitch missing.
- Guards and stairs on decks not shown.
- Materials not noted where the code or HOA requires them.
- Elevations missing for one or more sides.
See why building permits get rejected for how to avoid these.
How elevation drawings are made
Elevations are drawn from the floor plans and roof plan, with heights from measurements or the design. For existing buildings, exterior measurements and photos are used; see how to measure a house. In CAD or 3D modelling software, elevations can be generated from a model, which keeps them consistent with plans. Our elevation drawings service produces permit-ready elevations from your plans, photos or measurements.
Reading elevation drawings
- Note which side is shown and the scale.
- Find the grade line and reference levels.
- Read the height dimensions and roof pitch.
- Match windows and doors to the floor plan.
- Read material notes.
- Look for callouts to sections and details.
Openings near property lines
The building code limits windows, doors and vents in walls close to a property line, because fire can spread between buildings through openings. Under the IRC, walls closer than a set distance to the lot line need fire-resistance-rated construction, and openings may be limited or prohibited, depending on how close the wall is and whether the building is sprinklered. Elevations are where reviewers check this, so dimension the distance from each wall to the lot line on the site plan and note any rated walls on the elevation. This matters most for additions, garages and ADUs on narrow lots.
Decks, stairs and guards on elevations
Where a project includes a deck, balcony or exterior stair, the elevation should show it with its height above grade, guard height, baluster spacing note and stair profile. Reviewers check that guards are present wherever the walking surface is more than 30 inches above grade, and that stairs meet rise and run limits. See deck railing and stair code.
Elevations in historic districts
In historic districts, elevations carry more weight than anywhere else. Commissions look at proportions, window types and patterns, trim, roof form and materials, and often want existing and proposed elevations side by side, with photographs. Window replacements, siding changes and porch alterations that would need no drawings elsewhere may need elevations here. A short narrative describing how the design respects the existing building helps.
Colour and material legends
Permit elevations are usually black and white, but HOAs and design review boards often want colour. A simple approach is a material legend: a numbered key to siding, trim, roofing, stone and accent materials with manufacturer and colour names, with the numbers placed on each elevation. For larger or more visible projects, a coloured elevation or a rendering communicates the result better than notes alone.
Elevations and existing buildings
For additions and alterations, the existing building’s elevations come first. They are drawn from exterior measurements and photographs. Accurate eave and ridge heights matter, because the new work must tie in at the right level and the overall height is measured from the combined building. If the existing house is close to the height limit, even a small change in roof form can matter.
Interior elevations
Interior elevations show walls inside a room, typically kitchens and bathrooms, with cabinets, tile, fixtures, outlets, mirror and accessory heights, and the extent of wall finishes such as tile around a shower. They are rarely required for residential permits but help contractors and clients. They are referenced from the floor plan with elevation markers.
Elevations for decks, fences and small projects
Even small projects sometimes need an elevation. A deck permit usually wants one view showing height above grade, guards, stairs and the ledger location. A fence permit may ask for a typical fence elevation showing height, style and the bottom gap. A shed or carport needs one to prove height. These are simple drawings, but they answer the reviewer’s questions directly and avoid a correction round.
A worked example: detached garage elevations
For a 24 × 24 ft detached garage in a district with a 16-foot accessory height limit measured to the mean roof height, the front elevation would show the slab 6 inches above grade, 9-foot walls, a 6:12 gable roof rising 6 feet to the ridge, and the overall dimensions. The mean roof height is 0.5 + 9 + 3 = 12.5 feet above grade, well within the limit, while the ridge sits at 15.5 feet. The side elevations show the service door and windows, and a note lists siding, roofing and trim to match the house. With those numbers on the sheet, the reviewer can confirm compliance at a glance.
Elevations for contractors and builders
Builders use elevations to set heights, order windows, estimate siding and roofing quantities, and plan exterior finishes. Clear, dimensioned elevations reduce questions on site. Our contractor services provide elevations for permit and construction use.
Frequently asked questions
What is an elevation drawing?
A flat, straight-on view of one side of a building, showing heights, openings, roof shape and materials, drawn to scale so dimensions can be measured.
Do I need elevation drawings for a permit?
For additions, new buildings, garages and ADUs, almost always. Interior remodels rarely.
How many elevations do I need?
Usually all four sides for new buildings; affected sides, or all, for additions. Irregular buildings may need extra elevations for walls that aren’t visible in the main four.
What is the difference between an elevation and a rendering?
An elevation is a measured, flat technical drawing; a rendering is a realistic perspective image.
Do elevations need dimensions?
Yes, at least heights from grade to floors, plates, ridge and the measured building height, plus any limits the code sets on wall height.
Can elevations be drawn from photos?
Photos help, but measurements are needed for accurate heights and openings.
Do elevations need to show colours?
Not for most building permits. HOAs and design review boards often want colours or a material legend.
Who prepares elevation drawings?
Designers, drafters, architects or engineers. In most states, residential elevations don’t need a licensed professional unless the jurisdiction requires one.